Production part approval process is one of the finest ways of ensuring the quality standards of Components supplied and their production process. Production part approval process is prevalent in many manufacturing industries; however, the need was felt by the automotive industry to standardize the process of material and manufacturing quality.
Hence, production part approval process is one of the most systematic way developed by Automotive Industry Action (AIAG) group in 1993 to ensure the quality maintenance of the material supplied as per the client’s requirements. The input for PPAP was derived from Ford, Chrysler and GM and the latest version was the AIAG’s 4th edition with effect from June 1, 2006.
PPAP process requirement
Significant production Run: The minimum requirement relates to Quantity and time took where the production run refers to minimum 300 consecutive parts should be produced in one go, and it should be one hour to eight hours of production. The production site(environment) should be uniform for all the parts assembled including tooling, gauging, process, material, operator, etc. The measurement gauge should be similar to the full production run.
Previously, everyone had their quality standards however neither they were comparable with the other firms in the industry nor competitive because they all were not standardized. Everything was so scattered around that none could identify that if they are making a right judgement to quality or not.
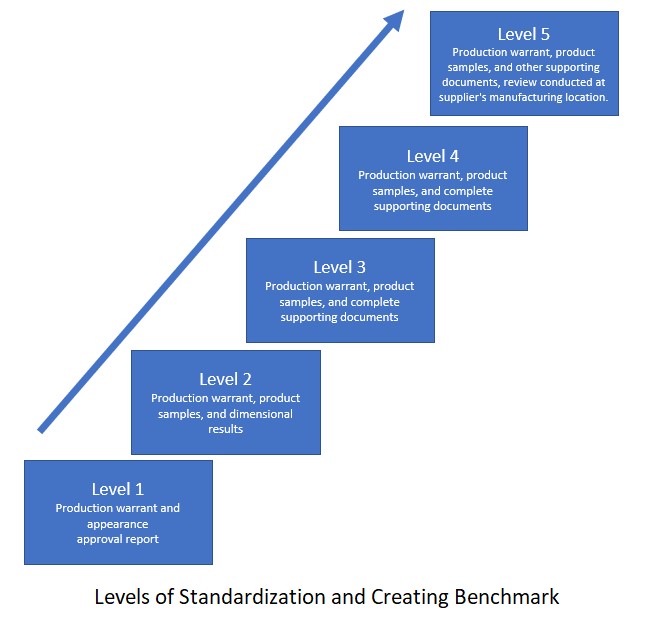
The process of standardization and creating a benchmark is divided into five levels:

Level 1: where only two documents are submitted relating to the above components, i.e., production warrant and appearance approval report.
Level 2: production warrant, product samples, and dimensional results
Level 3: production warrant, product samples, and complete supporting documents
Level 4: Production warrant and other documents as instructed by the customer.
Level 5: Production warrant, product samples, and other supporting documents. At this level, a review is conducted at the supplier’s manufacturing location.
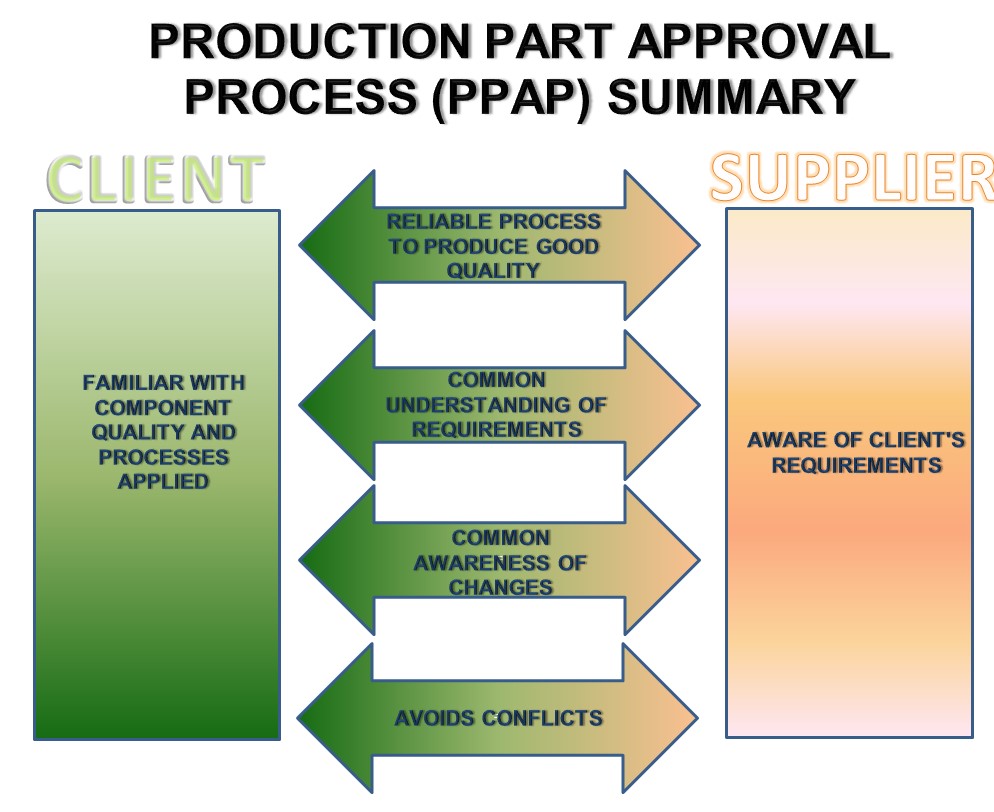
Hence, PPAP is an appropriate way of ensuring the following:
- The supplier is aware of the client’s requirements.
- The client is familiar with the quality of the component supplied as well as the process followed.
- The process is reliable enough the consistently deliver such quality of goods in the future that meets all the client’s requirements.
- It develops an understanding between the customer and the supplier that the product will meet the design and specification requirements.
- If there are any changes, they are in accordance and agreement with the client’s approval.
- Helps to avoid conflicts at the end of the contract.

The following are the components that form part of the production process improvement plan where the process is defined is documented:
a. Design record: It contains the list of all the designs a supplier offers to the specific client.
b. Authorized engineering change document: If not yet recorded in the design records, any authorized engineer’s changes in the product or the process are mentioned under this heading.
c. Customer Engineering approval: There are few changes that are also termed as the “core changes” which require the authorization of the customer. Hence the customer approval documents must be collected and recorded.
d. Process is monitored, analyzed and improved based on the data.
e. Records are created, maintained and retained.
f. FMEA which refers to failure modes and effect analysis which is further divided into two parts:
DFMEA: Design FMEA, in case it’s a turn key project where you supplier himself designs the material.
PFMEA: process FMEA is required to ensure the risk of failure is lower in the process, and evidence is needed to be submitted for the same.
g. Process flow diagram: It describes all the steps taken in a sequence. It is created to facilitate transparency.
h. Master sample: It could be either physical or analytical sample. Depending on the type of product the master sample is determined
If the material is in bulk and unchanging over a passage of time, in that case, the physical sample is master sample whereas if the bulk material changes with time such as finger prints, the analytical sample is a master sample.
i. Test results documentation: A record of material and performance test results are conducted to ensure that the material quality and functional requirement match the design record or control plan.
j. Initial Process capability study
k. It is the statistical way of process capability where the specific benchmark is used to determine whether the process currently meets the customer requirements. This is similar to six sigma black belt study.
l. Measurement system analysis studies and qualified laboratory documents
m. Control plan: The control plan is classified into three types- Prototype, Prelaunch, and production. The format of control plan must comply with IATF 16949:2016 requirements
n. Part submission warrant which is the summary of all the above observations is required to be submitted to the customer along with Appearance approval report. Once, you have submitted the sample production part to the customer; you need to ensure that incase customer wants to make changes to the document then a customer specific documentation shall mention the same. It could be part specific or component checking aid.
Finally, the customer may make any of the following decisions:
• Full approval
• Interim Approval
• Rejected approval
All the documents must be retained by the organization until the part is active plus one calendar year.
