The Acceptable Quality Level is a statistical tool to inspect a particular sample size for a given lot and set maximum number of acceptable defects. In order words, it is the worst tolerable process average when a continuing series of lots is submitted for acceptance sampling.
The AQL has been recently renamed from “acceptance quality level” to “acceptance quality limits”. It is the limit that customer sets which is not really acceptable. Customers prefer zero defect products or services, which is the ideal acceptable quality level. However, customers arrive and set acceptable quality limits based on business, financial and safety levels.
The AQL of a product would vary from industry to industry. Companies dealing with medical tools would have more stringent AQL, as acceptance of defective products could result in health risks. Companies usually face two possible situations, to weigh against; cost involved in testing stringent acceptable levels or spoilage due to lower acceptable levels with a potential cost of product recall. AQL is an important statistic for companies seeking Six Sigma level of quality control.
Failure to meet the requirements of customers with respect to quality is termed as defects. In practice, there are three categories of defects
- Critical Defects: Defects, when accepted could lead to harm the users. Such defects are totally unacceptable. It is defined by 0% AQL
- Major Defects: Defects usually not acceptable by the end users, as it is likely to result in failure. The AQL for major defect is 2.5%
- Minor Defects: Defects, which are not likely to reduce materially the usability of the product for its intended purpose but slightly differs from specified standards. Some end users still go ahead and buy such products. The AQL for minor defects is 4%
Lets get introduced to AQL tables and understand with an example
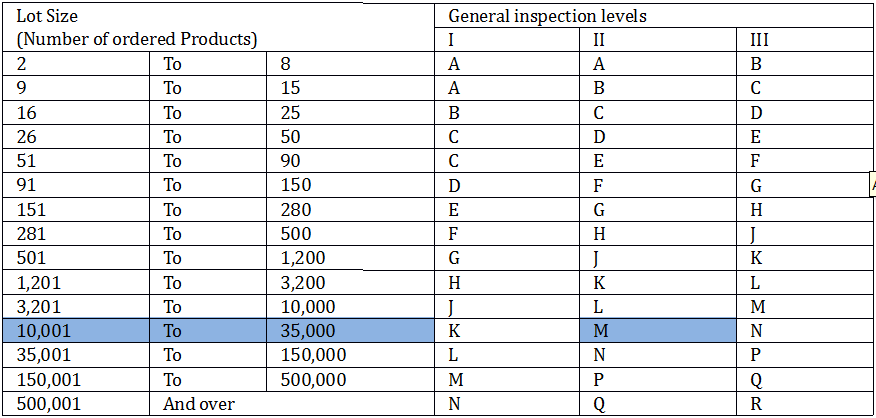
Customer A buys 12000 units from Factory AB, and Customer A chooses inspection level II (which is chosen by default for most inspections).
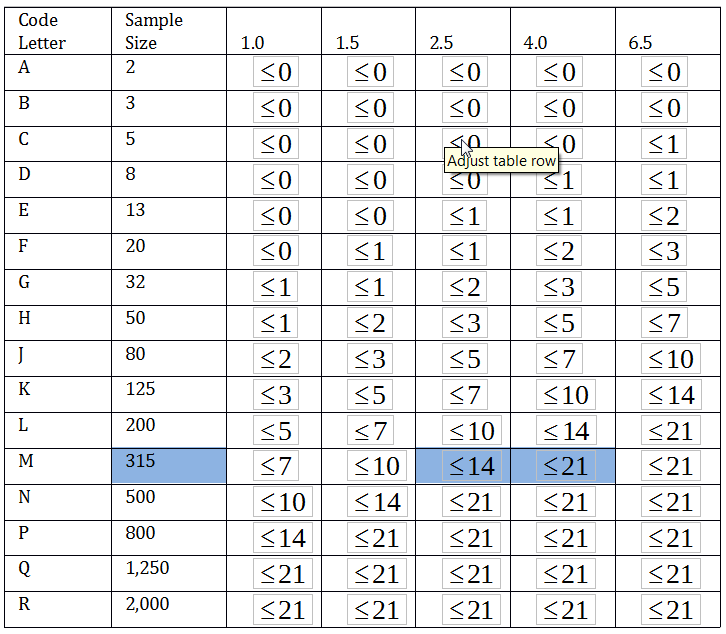
There are basically 2 tables. First table tells you the ‘code letter’ to use. Then, second table with reference to code letter gives you the sample size and maximum number of defects that can be accepted.
Table 1: Code letter identified from given sample size

For given example, of 12000 units it is comprised between 10,001and 35,000 and with inspection level being II, code letter is M.
Table 2: Table below is only valid for single sampling plan under normal severity

With code letter as M, we arrive at sample size of 315 units. So you will have to draw 315 units randomly from the total lot size of 12000 units.
Lets assume, major defect AQL is at 2.5% and minor defect is at 4.0%. Therefore, the units are accepted by customer A if there are no more than 14 units with major defects and no more than 21 products with minor defects, in the sample size. However, if you find 18 units with major defect and 25 units with minor defects, then the units are refused.
Please note number of defects is not the only criteria for acceptance or refusal. There are other criteria’s that would be applicable depending upon the type of industry and customer needs.
